Thursday, December 5, 2013

New Pattern Coming Soon!

Very soon 2014 will be here and I'm pretty excited about leaving 2013 behind. It was not very good to me personally and professionally.

It means that it is time for me to try something completely different! So starting in 2014, I will focus mainly on pattern design and my pattern shop. I will probably try and find an alternative to Etsy as well because although I love the instant download feature, after I pay the Etsy listing fee and the Paypal fee, I barely get paid for my patterns. (If you have ever attempted to create a pattern, you will realize how much work it is. For a larger bag, it takes me at least 2 weeks of working everyday to create a PDF pattern!!)

Now for those who love my handmade creations, do not fret. I will have plenty of sample bags to sell in my regular Etsy shop. I will also accept custom orders for any of my patterns in your choice of fabrics. I simply can't go on just trying to sell larger bags only. I know some Etsy sellers seem to have great luck selling bags at a $100+ price point but I am not one of them. I don't know if it's my photos or styles or lack of features or bad fabric selections but I am exhausted trying to figure it out.

So to start things off, here is my first bag pattern of 2014:


It does not have a name yet but if you're paying attention, it will most certainly have a flower theme to it. :)

This is a larger sized bag measuring approximately 13 inches wide at the bottom, 9 inches high at the centre and 4 inches deep. It has double shoulder straps which are not optional and a removable cross body strap which will be optional. On this test bag, there is an identical outside pocket on BOTH sides of the bag but of course, that is optional. You could make it with a pocket on one side or have none at all.

There are some optional faux leather accents. But they can be made in any fabric you want although I would recommend using something thicker than quilting cotton. (As an aside, I am no longer using quilt weight cotton on any of my bags except for the lining. It's just not durable enough!) I can't say enough nice things about faux leather - much cheaper than real leather, looks really great, easier to sew and just as durable if you buy a good quality. I buy mine at fabric.com and I usually buy the more expensive stuff.

More pictures (because everyone loves pictures right?):


I have my usual  inside pockets: 3 slip pockets and 1 zippered pocket but of course, all of this is customizable. 

I am currently making some changes to the pattern and sewing another sample bag. I just wanted to change the way the bottom was made and the faux leather bottom will come up the sides of the bag slightly. I've heard from many that they did not like fabric touching the floor when they set the bag down so I will solve that problem. 

This is a longer sewing project - it takes me up to 4 hours to make this bag but I think it is worth it. There is a total of 6 decent pockets. This is a great everyday bag!

I have tons of sketches for more patterns including some pillow cover ideas. If you want to see which patterns I currently have for sale, check out my pattern shop on Etsy!

Tuesday, May 7, 2013

Dahlia Drawstring Duffle Bag Pattern Release and Giveaway

As expected, I did have a delay in getting the Dahlia bag pattern listed in my pattern shop but it is finally there and ready to go. To celebrate this pattern release, I have decided to give away the 2 sample bags I created!

First I have this lovely bag in a beautiful Anna Maria Horner velveteen:


It turned out perfectly except that I should have used a lighter weight fabric for the drawstring closure so unfortunately it does not close completely as I would have liked.

The second sample bag is this one in a canvas print with birds on branches. This one turned out great except for one slight problem - my needle became damaged and pulled some threads a bit when I sewed the casing. But it honestly hardly shows at all - especially when the drawstring opening is closed. And it does not affect the bag's durability or functionality.


If you are interested in either of these bags, just enter a comment below. There is no need to follow my blog but if you do, leave a 2nd comment so I can count you for an additional entry. This giveaway will end tomorrow night at 9 PM EDT and winners will be posted here and on my Facebook page.


Sunday, April 21, 2013

Coming Soon: The Dahlia Drawstring Duffle Bag


Just a few more tweaks and I should have a new pattern available very soon! This adorable drawstring bag is perfect for the younger crowd (teenagers?) who aren't quite ready to start carrying purses but still want something trendy and stylish to carry around. I used this GORGEOUS Anna Maria Horner fabric for the outside - it's a cotton velveteen and SO soft. I loved how it coordinated perfectly with the turquoise blue chevron twill I used on the top.

This will be a medium sized bag and to make it very handy, it will come with a cross body strap. I just have a few tweaks to make - the drawstring closure doesn't close all the way because I used a heavy cotton canvas for the lining and a heavyweight twill on the outside so the fabric doesn't really bunch up enough to close the bag completely. I will have to change it so that top exterior fabric is done with a quilt weight cotton.

See? Not closing!!
Another great feature is the bottom - I used a beautiful faux leather for the bottom so the bag can be set down without getting dirty. Personally, I never set my bags down on the floor regardless - they have a special spot on the coat rack. But in case you do like to set your bag down on the floor, this bag is ready. AND the way the bottom is sewn on, you don't need a walking foot or teflon foot for your machine since there is no topstitching.

Measurements are:

Diameter of bottom: 7.5 inches
Height up to bottom of chevron fabric: 9 inches


I should hopefully have the pattern ready by end of week but no promises. Every time I set this kind of deadline, I get swamped with orders. :)

View of adjustable strap

Thursday, April 11, 2013

Patchwork Pillow Tutorial

After 2 years of thinking about posting a tutorial, here I am - FINALLY - with the very first of what I hope to be many. It's not that I don't want to share some of my ideas. It's just that as a mom to 2 fairly demanding kids I just don't have the time to do any kind of sewing except for whatever will provide me with a tiny bit of income. I'm sure other WAHMs will completely understand. Right? :)

So here we go - I made a set of lovely patchwork style pillows for a mini home decor project. I thought that since they were such a simple project with a lot of different possibilities, they would make a great tutorial. I found some old Joel Dewberry Modern Meadow fabrics scraps as well as some Robert Kaufman Essex Linen in Natural (I LOVE LINEN) and put them to good use.

Let me start with a little photo of what you'll end up with:


The finished pillow is about 20 inches wide x 15 inches high. But will seem a little less because of the puffiness of course.

Let's get started!

Start by gathering some supplies:

  •  4 coordinating fabrics for the patchwork squares. You will need a 5.5 in x 5.5 in square (x2) for each fabric
  • (2) strips of fabric 21 in W x 2.75 in H
  • back piece approximately 21 in W x 15 in H (don't cut this yet!)
  • polyester batting (or whatever brand you prefer). I get the very fluffy kind!
  • matching thread
NOTE: If you plan on washing your pillow, you will want to pre-wash and shrink your fabrics! In which case, you'll want to wait and cut your pieces after this process is done.

Once you have your squares and top and bottom strips of fabric cut, you should have something that looks like this:


Let's start sewing:

Please note that throughout this tutorial I am using a 1/4 in seam allowance! 

Start by sewing your 1st row of patchwork squares together. Place square 2 over square 1 right side together, pin and sew your seam making sure to backstitch. Press the seam open.


Then pin square 3 to square 2 and sew together. Press seams open and continue like this until you have sewn the top 4 squares together and then the 4 squares of your 2nd row. You should end up with something like this:


Now you are going to flip your top row of squares over the bottom row, right sides together and try to line up the seams between your squares as perfectly as possible. Pin in place. Sew the 2 rows together and press your seam open again working slowly to make sure your patchwork is nice and even and flat.
It should look something like this from the back:


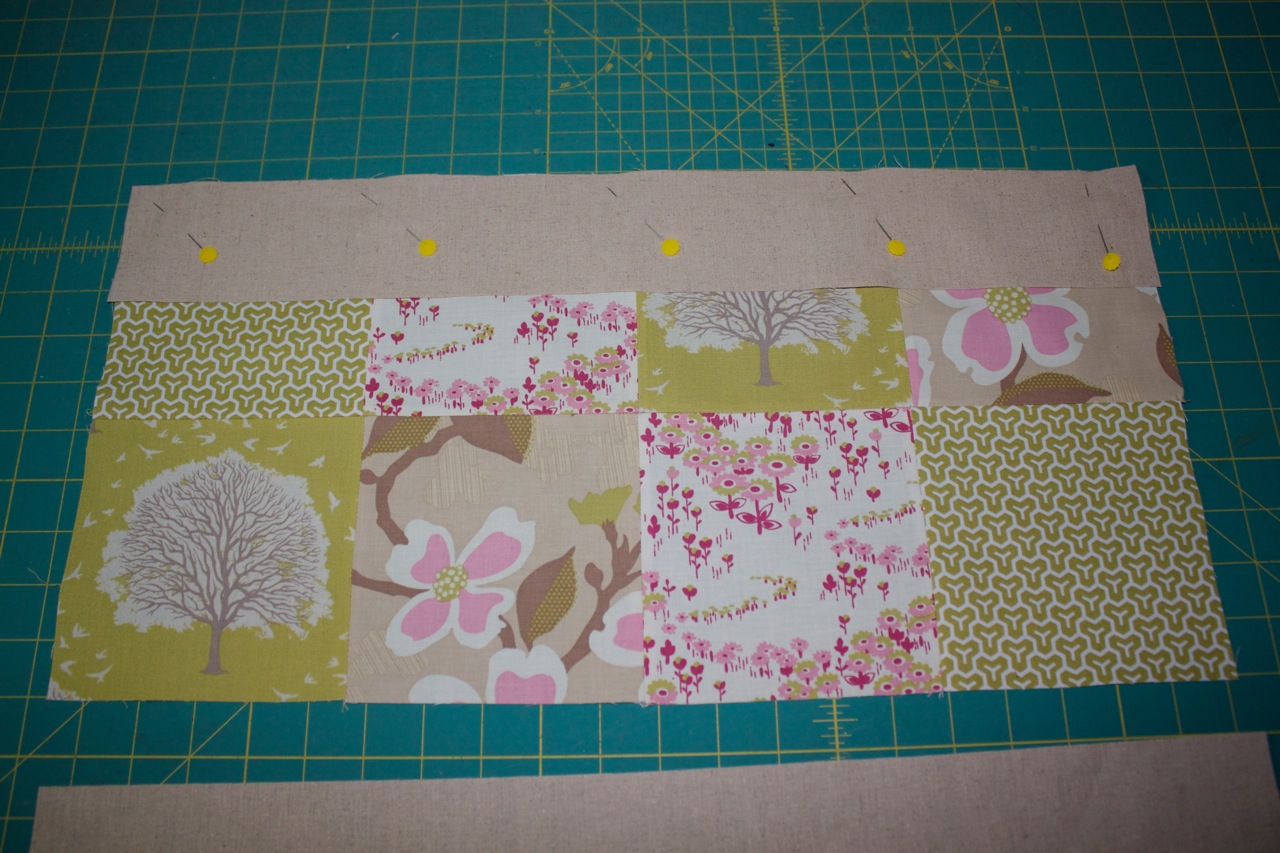
Now we add the top and bottom strip of fabric (linen in my case) to the patchwork. Your strip may be a little wider than your patchwork - don't worry about that right now! We are going to trim it later.

So here we are with the top strip pin to the top of the patchwork, right sides together. Sew the seam, press flat. Repeat for bottom strip.


Here is our completed front panel for our pillow:


Take a long ruler and trim the sides of your panel if it is uneven. (I trimmed a bit on the left side).

Now we are going to use the front panel to cut out a piece of fabric for the back of our pillow. I used the dogwood bloom print from the patchwork. I would've preferred to use the linen but I didn't have enough. :(

NOTE: You can repeat the whole patchwork panel again and use it for the back of your pillow. Which would probably result in a prettier pillow but for the sake of this tutorial and getting it finished before children wanted something from me, I didn't.

Place your patchwork panel on top of your fabric WRONG sides together and make sure it is nice and flat. Cut out your back panel.


Now take your back panel and place it over your front panel right sides together and pin in place. Now you want to sew a seam around the outside of the panels using a 3/8 in seam allowance. I like to take a bit more here because I want a sturdier seam. Pillows really take a beating in my house.

Stitch all around leaving a 3 inch gap at the bottom for turning. I make sure to backstitch at the beginning and end of this seam because I don't want to have my stitching unravel when turning the pillow.

Confession: I HATE sewing by hand. So I make my gap as small as possible without damaging my stitching.


Clip your corners:

Turn your pillow right side out. Gently push out your corners so they look nice. You can use a chopstick but I like to use the handle of a paintbrush because the ends are nice and round. (I've used chopsticks to disastrous results.)


TIP: To make your hand stitching MUCH neater and perfect, press your opening closed trying to follow the edge of the seam as perfectly as possible. Do this before your stuff the pillow. Of course.


Stuff! Make sure you stuff into the corners otherwise they will be empty and your pillow will not look very nice.

Now the tricky part (for me). Hand stitching the opening closed. I use a ladder stitch. I found many wonderful tutorials and diagrams online which I don't want to replicate or use without permission. So here's a wonderful video I found.

When you are done stitching, your opening should look like this:


And you're all done! Feel free to comment, ask questions and I will try to respond ASAP.

Happy sewing!

Tuesday, April 9, 2013

The Lily Pleated Bag Pattern


After a lot of photo editing and document writing and PDF creating, I finally have some new patterns in my pattern shop. Believe it or not, the hardest part has been finding pattern testers! Who doesn't want a free pattern to try out?? (Confession: I am a pattern junkie). Well, I finally managed to get some feedback from 2 lovely ladies and here is the result: The Lily Pleated Bag.

This bag is probably a bit trickier for a beginner so I do recommend it be purchased by someone who has intermediate/advanced sewing experience. I use faux leather/vinyl for the bottom corners and the exterior top band which requires either a walking foot or a teflon foot attachment. It comes with some strap options as well as instructions for a zippered pocket (also optional!).

If you try it out, please feel free to send me a message letting me know how you liked it. :)

Saturday, March 16, 2013

Starting on a new adventure: Pattern design!

After too much procrastination, I've finally decided to start creating and selling PDF sewing patterns. This is something I've thought about for quite a while now and I'm very excited to get started.

I'm not certain what type of projects I will design but certainly, there will be many bags! I have purchased many sewing patterns in the past and I find there is definitely a lack of variety for larger bag styles. I also will create some smaller, simpler patterns for clutches and maybe a wallet.

To start, I have a pillow cover pattern that I created over a year ago for a fellow Etsy seller who is no longer selling. It is called the Tulip Garden Pillow Cover and it can be purchased in my new pattern shop: http://bluecallapatterns.etsy.com.

So if you're looking for a great home decor project for Spring - this is a great beginner's project that only takes about an hour or so and uses up some of those small fabric scraps you have lying around!

Friday, February 1, 2013

A different kind of loot bag - pencil cases!

My daughter's 5th birthday is coming up and now that she has started school and has friends, we've decided to have her first birthday party. She insisted on having a bowling party and picked out 10 friends to invite.

Mr Blue Calla and I discussed what we wanted to give instead of loot bags. We aren't huge fans of loot bags filled with items from the dollar store. (I've thrown out most of these items in the past so I really wanted to think of something the kids can use that is of course, handmade!) When my friend Lisa came by the other day to buy a bag from me, she also brought me some fabric remnants. Turns out she designed a fabulous Lego print and brought me 2 remnants large enough for a good sewing project. We were planning on giving some mini Lego figures instead of loot bags but then I got inspired by the Lego fabric to create some pencil cases to put the Lego figures in. Here is what I came up with:


If you'd like to order some Lego fabric of your own, here is a link to Lisa's Spoonflower page.

She also has a few other fantastic prints. I have a piece of the leaf lines fabric as well and it's pretty awesome.