Friday, July 31, 2015

Tutorial: Adding an internal zippered pocket in a bag

Whenever I am writing a new sewing pattern, I always think to myself that a tutorial for repetitive features such as interior zippered pockets would be nice. I did not include zippered pocket instructions for my latest pattern - the Hydrangea hobo bag - within the pattern. Instead I decided that I would write up a blog post on how I make all of my zippered pockets. I will also try to explain how to make the pocket smaller for smaller sized bags.

Assuming you are working on a pattern where the bag is at least 12 inches wide and 9 inches high, this tutorial will work.

What you will need:

(1) 8-inch zipper
(2) pocket lining pieces 10 inches W x 7 inches H
(2) lightweight fusible interfacing pieces 10 inches W x 7 inches H
(1) piece of lightweight fusible interfacing 12 inches W x 4 inches H (to reinforce opening)

Note: if your bag is smaller, you need to reduce the dimensions of all pieces. For example, if your bag's lining is 10 inches W x 8 inches H, than you would cut your pocket lining pieces 8 inches W x 5 inches H. You would then need a 6-inch zipper instead of an 8-inch.

STEP 1:

Fuse matching interfacing pieces to the WS of both of your pocket lining pieces. Fuse the remaining piece of interfacing to the WS of one of your lining panels about 1 inch from the top edge.


STEP 2:

Take one zippered pocket lining pieces and draw a rectangle on the WS that is 8 inches W x 1 cm H. You want this rectangle to be positioned 1 inch from the top and centered so there is 1 inch on either side from the edges.
 

STEP 3:

Take the zippered pocket lining piece with the rectangle and pin it on your lining panel (the one with fusible on the WS) about 1.5 inches from the top edge and centered in the middle of your panel. Stitch along the rectangle lines keeping your needle in the down position to make turning corners easier. I like to use a shorter stitch length (2.2 approx.).


STEP 4:

Draw a horizontal line through your rectangle stopping about 1/2 inch from both ends. Then draw diagonal lines from the horizontal line to each corner as shown in red below.


STEP 5:

Cut out your lines using scissors being very careful not to cut any of the stitching at the corners.

 
STEP 6:

Pull the pocket lining piece through the opening you just cut out towards the WS of your lining panel. Press the rectangle opening's seam nice and flat to create a nice rectangular opening for your zipper.


STEP 7:

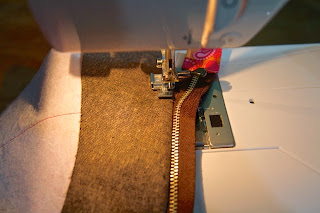
Place your zipper inside the rectangle opening and pin or glue in place (depending on what you prefer). Stitch the zipper in place by sewing around the rectangle opening with a 1/8" seam allowance.


STEP 8:

Take your second pocket lining piece and pin it to the first lining piece RST.

 
 STEP 9:

Stitch all the way around the lining pieces to sew them together and create the pocket.


 ALL DONE!

Please feel free to leave any questions or comments.

Wednesday, July 8, 2015

New pattern: The Orchid Waist Bag

I noticed recently that I saw a lot of people walking around with small bags that to me, resembled fanny packs but that they were being worn on the back instead of around the waist. I had an ah-ha moment and decided that someone needed to design a pattern to replace that old unpopular "fanny pack" and come up with something more modern. And so I came up with the Orchid Waist/Sling bag!


This bag is a nice size and full of awesome features:
  • adjustable strap so the bag can be worn around your waist or on your back
  • main compartment with a zippered closure
  • 2 slip pockets inside
  • large front exterior pocket with a flap that also has a built in zippered pocket

Measurements for the bag are 11.5 inches W x 8.5 inches H. I can see this as a unisex bag depending on what fabrics you use. Here are a few photos to demonstrate!

Worn around the waist

Worn on the back but can also be worn on the front if you prefer

Nice and deep exterior pocket with a flap closure

Zippered pocket inside the front flap

Another view of that front pocket

2 slip pockets inside the bag
The Orchid Waist bag pattern is available today!

Wednesday, May 27, 2015

Tutorial: Wristlet wrist strap

I have seen many different ways to sew a wrist strap thoughout the years and I had an "ah-ha" moment while working on the wrist strap for my latest pattern and decided to whip up a short tutorial to share with everyone.

The great part about this wrist strap is that it does not have any exposed raw edges at all - not hidden in the D-ring, not hidden inside the strap. In this example I will be making a strap that is 1 inch wide. (You can adjust accordingly for your project - just keep in mind that you need to quadruple the amount of fabric you want so if you want a strap that is 1/2" thick, you will need to cut your fabric 2 inches high.)

For this tutorial you will need:
  • (1) D-ring strap fabric 3 inches W x 4 inches H
  • (1) piece lightweight fusible interfacing 3 inches W x 4 inches H
  • (1) Wrist strap fabric 15 inches W x 4 inches H
  • (1) piece lightweight fusible interfacing 15 inches W x 4 inches H
  • (1) 1" D-ring
  • (1) 1" Swivel clasp
 Before starting, fuse the matching interfacing to the wrong side of both strap pieces.

Create your D-ring strap piece:

Start by folding the strap piece horizontally, press to create a crease. You should now have a piece that is now 3 inches W x 2 inches H.


 Open up the strap piece and fold both halves in towards the center crease. Press.


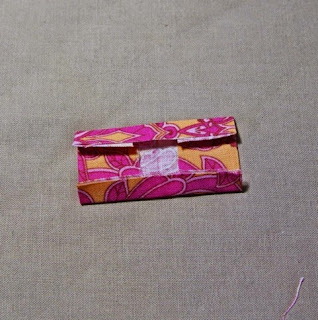
Fold in half again along original crease. Press. You should end up with a strap piece like the photo below.


Stitch along both sides of the strap piece with a 1/8" seam allowance.


Slip the strap piece through your D-ring. Fold the ends together and baste stitch together. Set aside.


Create your wrist strap:

Follow the same steps as the D-ring strap piece with the wrist strap piece until you end up with a fabric casing as shown in photo below. DO NOT stitch the strap closed yet!


Take your swivel clasp and pass the wrist strap piece through the ring of the swivel clasp. Now take both shorter edges of the strap piece and open them up. Make sure you do not twist the strap piece and pin the edges right sides together.


Stitch the shorter edges together. 


Press the seam allowance open.


Then re-fold your wrist strap into a loop that is 4 layers thick. 


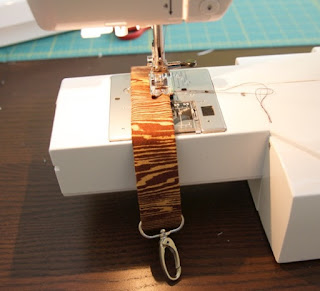
Pass the strap around the arm of your machine and stitch one edge of the strap with a 1/8" seam allowance making sure you are pushing the swivel clasp out of the way as you sew. Make sure to backstitch at the end.


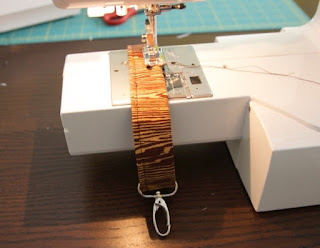
Stitch the other edge of the strap with a 1/8" seam allowance again sliding the swivel clasp down as you sew.


Now find the joining seam and place it close to the swivel clasp's ring but not inside (it will be too bulky because of the seam). Stitch right on that seam (I stitched a square pattern on my strap) to close the loop and stitch your swivel clasp in place.


You're done! Now you just need to attach your D-ring strap to your project.


Friday, May 22, 2015

Tutorial: Adding a zippered closure to your Daisy Cross Body Bag

Although I personally prefer a magnetic snap on my own bags, I realize that many prefer zipper closures both for practical and safety reasons. My latest pattern, the Daisy Cross Body bag includes instructions for a magnetic snap closure and I decided to provide a free tutorial for a zipper closure.

Before starting this tutorial, you will need to purchase the pattern and cut out all necessary pieces. In addition, you will need the following:
  • a small piece of quilt weight cotton 1.75" H x 4" W for your zipper end casing
  • Cut (2) Lining Panel on fold in lightweight fusible interfacing 
  • 12" zipper (a longer zipper can be used and cut down)
When applying interfacing to the different pieces, also fuse the interfacing to the wrong side of each lining panel. (This means you do not need the piece of fusible meant to reinforce the interior zippered pocket.)

You should go through the pattern as normal but when you get to the "Lining Assembly" section, do not stitch the inner bands and lining panels together. First, start by installing your zippered pocket and your slip pockets. You should also transfer your pleat marks to the wrong sides of your lining panels before continuing with this tutorial.

To begin the zipper closure installation, prepare your zipper by adding a casing to the zipper end.

1. Start by taking your casing fabric and fold it in half vertically. Press to create a crease.


2. Open up the casing and fold in both halves about 3/4" towards the crease, wrong sides together.


3. Now fold in the top and bottom in towards the wrong side about 1/4".


4. Slip your zipper end inside the casing and fold the casing in half along the original crease. Press and pin in place.


5. Stitch with a 1/8" seam allowance all around the edges.


6. Now take your 2 inner bands and your 2 lining panels with pockets already in place.


7. Take one lining panel and pin your zipper along the top edge, both right side up. Make sure to fold under your zipper tape at the beginning of the zipper and pin in place approximately 1.5 inches from the left edge.


8. Do the same as the end with the zipper casing. You will want to pull your zipper away from the top edge approximately 1.5 inches from the right edge so that it will not be sewn into the seam.


Zipper end being pulled away 1.5 inches from the right edge of the lining panel.

9. Now you will pin the bottom edge of the inner band to the top edge of your lining panel.


10. When stitching the band in place, again make sure you do not include the last 1.5 inches of the zipper in the seam.


11. Notch the curves of your seam allowance.


12. It is a bit tricky because of the curve of the pieces but go slowly and iron the inner band and lining panel away from the zipper. I find it easier to just press the inner band first, then flip it over and press the lining panel.


13. Topstitch the edge of the inner band.


14. Repeat steps 7 to 13 for the second lining panel and inner band until you end up with this:


15. Continue with the assembly of your lining shell following the patterns instructions. The only difference is that you now have a seam to deal with between the top band and lining panel. Make sure the seam allowance is placed down towards the lining panel when attaching the gusset.


16. You should end up with a lining shell as pictured:


17. When doing your final bag assembly, everything is the same as instructed. Simply open the zipper closure as wide as it will go and insert your exterior shell inside.

Please do feel free to leave comments if you have any questions!

I would also love it if you shared your Daisy bags in my Facebook group.


New Pattern: The Daisy Cross Body bag

I have been busy working on new pattern ideas lately - so many ideas, so little time! My latest pattern is the Daisy Cross Body bag. I wanted a mid-sized bag that included some patchwork and a different type of gusset. I also designed with the possibility of a zipper closure in mind since most prefer that type of closure.


 The most remarkable part of this bag is clearly the dresden plate style patchwork. It does require a bit more time and effort to complete but I think it is well worth it in the end! The possibilities are endless and I've done a bit of fussy cutting for mine.


You can also omit the patchwork - especially if you wish to feature a fabric with a fabulous print.


I do love bags with a gusset but wanted to make this one a little different. I decided to add 4 small pleats to the bottom of the main panels to give the bag even more depth. If you consider the pleats, the depth of this bag is about 7 inches!

I had originally intended for double shoulder straps but after some feedback, I noticed a clear preference for a cross body strap (a personal must for me) so I quickly changed to an adjustable strap.


I decided to create a simpler curve for the bottom of the interior top bands in case someone wanted to install a zipper closure instead of a magnetic snap closure. I did test it out and it worked well so I plan on publishing a free zipper closure tutorial in the near future.


For the bag's interior, I did my usual configuration: 1 zippered pocket and 2 slip pockets. Apart from the different top bands, the construction of the lining shell is exactly the same as the exterior.

The Daisy pattern is now available in my Etsy pattern shop here. If you wish to discuss this pattern or any other pattern I have designed, I have created a Facebook group dedicated to sewing patterns. You can request to join here.