Saturday, December 31, 2011

Fun in the snow

We went to Ottawa to visit my family for Christmas. There was no snow here in Toronto when we left but Ottawa was nice and white. The kids had so much fun and are impatiently waiting a large snow fall here at home.


I wish I could take credit for these wonderful photos but I can't. My husband took these. :)

Monday, December 12, 2011

Coming in 2012: Insulated Lunch Totes

I've finished my first successful sample of a new item for 2012: an insulated eco lunch tote! This one is specifically geared towards children but I am considering making them for adults as well.  I have been struggling with making them as affordable as possible but the cost of materials is quite high for these. For this sample I used some wonderful new fabrics by Khristian A Howell from her collection called "The Woodlands". (How adorable is that acorn print?)


A bit about these lunch totes:

  • they are machine washable (all fabrics have been pre-washed and pre-shrunk)
  • they are insulated
  • they measure 11 inches wide at the top and 9 inches wide at the bottom x 9 inches high x 5 inches deep
  • they are lined with a water resistant ripstop nylon
  • they have a small pocket on each side between the straps
  • the straps are long enough for children to carry over their shoulder


More pictures:


As you can see, there is plenty of room inside. I could fit a juice box and more items other than these 3 containers. I will also be making coordinating snack bags and sandwich bags, also machine washable.


I'm pretty excited about these! I have so many great fabrics that I washed in preparation for making these lunch totes. I have 2 other new projects that I am working on but I am still in the design stages. :)

Monday, December 5, 2011

Almost done...

I admit it - I am now addicted to making these adorable doll outfits. I have just finished 3 new outfits.
I received the "Meet the Gang" fabrics and they did not disappoint! I love the colours! So I decided to make this pretty peasant dress with matching shoes:


And then I made this adorable outfit with a criss cross top and some matching ruffle pants. The pattern called for a velcro closure but in my experience the velcro gets full of lint and stops working after a while so I used my cow girl snaps instead.


And lastly, I made this adorable footed pyjama in the same Riley Blake flannels as 2 sets of pyjamas Zoe owns. She will be tickled pink! (I used one of the dolls I have for sale to model these)


All I have left to make is the tote to carry everything and most importantly, her doll! (I am so anxious to finish that I am considering not waiting for the pale grey cotton I ordered for the doll and using a pale brown or a tan instead. )

Sunday, December 4, 2011

A handmade Christmas

My Etsy holiday sales were a bit slower than I expected this year - which is bad but also great because I can devote more time to making gifts for my family.

I have purchased a few patterns from Bit of Whimsy Dolls and I plan on making my daughter the 
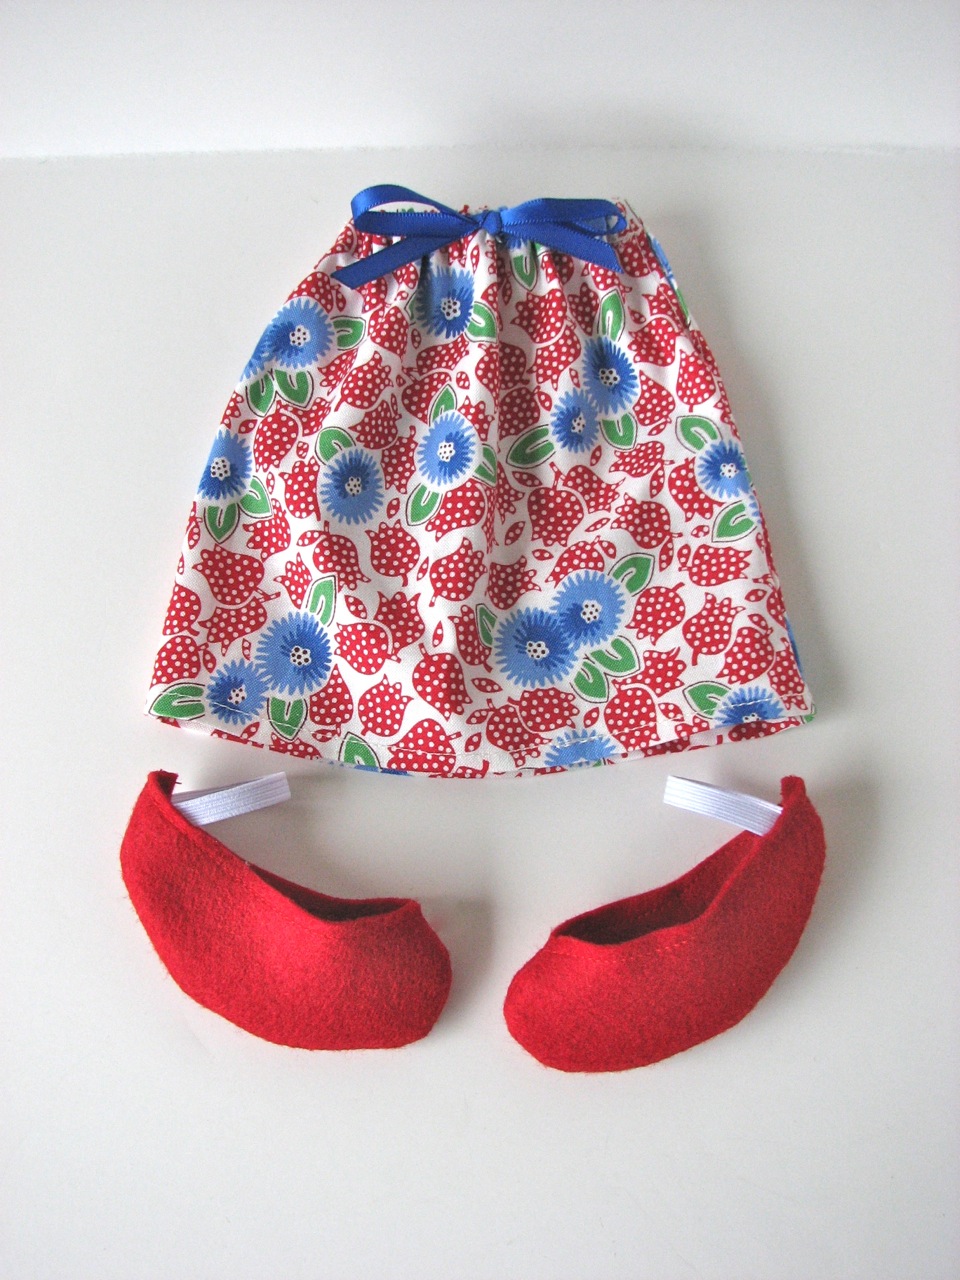
Rose doll and most of the clothing patterns. So far I have made the romper and the summer dress with matching shoes. I made a few changes to the patterns because my daughter wouldn't be able to tie the bows so everything has elastics instead.

For the shoe pattern, I substituted the ribbon ties with a piece of 1/4 inch wide elastic that is approximately 3 1/4 inches long. It worked fantastically and the shoes are fairly easy to slip on and off.

The neck opening for both the romper and the summer dress normally closes with a ribbon as well but I used the same elastic as the shoes. I did find the outfits looked a little plain without the pretty ribbon so I've sewn a little ribbon bow to the front of each outfit. It is difficult to see from the photos but the arm openings are on each side near the top.


Romper


Summer Dress

I am waiting on a pale grey cotton to make the bunny doll and I also plan on making her a tote or some kind of case to hold all of the little outfits. Hopefully this will encourage her to keep everything in one place instead of spreading them all over the house like she usually does. :)

I will post new photos as I create more outfits!

Tuesday, November 29, 2011

Great new fabrics, some new ideas but no time

Well, I am just finishing up my Christmas orders plus I have the largest bridal order EVER (10 clutches!!!) but I just had to show off the most adorable fabrics I have just received. First is this great fabric called "Aux Champs Elysees" in Black from "L'Amour de la vie" collection.


I also received all of these fantastic prints from Khristian A Howell's latest collection: The Woodlands.


And then last of all, I ordered a few prints from Creative Thursday's "Meet the Gang" collection:


As for my ideas - I don't want to give anything away yet. I need to do more research and sew some samples but I'm going to try and focus a bit more on perfecting a few select items instead of spreading myself so thin. Stay tuned!

Wednesday, November 23, 2011

Halloween photo - almost a month later

I realized I completely forgot to post a photo of my Halloween spooks.  Here is my ghostbuster and my ice cream cone. Zoe is holding the trick or treat bag we made together. Sorry - not a very good photo!

Sunday, November 6, 2011

A New Doll for Zoe

My 3 year old daughter LOVES stuffed animals and dolls. We have a huge chest full and apparently, that's just not enough in her opinion. I came across these adorable doll patterns on Etsy from a shop called Dolls and Daydreams. I bought 3 patterns to try out and the Small Doll was my first attempt.

I have tried other doll patterns before - well actually, I've tried MANY doll patterns before. I really, really love these patterns. The look of the dolls is really great but the sewing instructions and tips are even better. I love how there is no visible seam where the legs join the body and there are some great tips for working with tiny limbs. I think my first doll turned out fairly well although I think next time, I will leave more un-stuffed space at the top of the arms and legs. I also need to make the ruffled skirt for this doll.  Zoe was in somewhat of a hurry to cuddle the doll. :)


Meet "Rosa"


A close-up of Rosa's face


A very happy Zoe with Rosa.

I will be trying out the Lamb and the fox doll next!

Sunday, October 30, 2011

Almost show time

First, I am a bad, bad blogger. I realize this and I need to change that!

Second, I am very busy at the moment preparing for 2 upcoming shows. One of them is an Open House with 2 other local artists. I have never done this type of show before so it should be fun and hopefully some neighbourhood peeps will actually drop in! I also volunteered to design a quick poster for the Open House - I am certainly NOT a designer. Here is my attempt:


The 2nd show is a huge craft show - also in my neighbourhood but should draw in a larger crowd since it is advertised. Strangely enough, I have not been sent a flyer or additional information about that show. (Note to self: please email organizer and ask what's up with that!)

In sewing related news, I actually managed to convince the kids to sew up their own trick or treat bags for Halloween. Of course, we made them together but I was so proud of them! They listened carefully to all the safety rules and I think they had a good time. I'll take a picture of them in their costumes, carrying those awesome bags and post it here on Tuesday.

Sunday, September 11, 2011

Pretty (yet painful) fabric flowers

My daughter LOVES small pouches, containers and boxes to store her treasures. So, after researching fabric flowers yesterday I decided to try making some small flowers to decorate a small wooden box for her. I found this fabulous (and very easy) tutorial on how to make no-sew fabric flowers. The flower assembly went smoothly and as I was gluing them onto the lid of the box, I fumbled and the largest flower fell - hot glue side down - onto my finger. I quickly ran to the sink and pulled the glue off along with 2 or 3 layers of skin. It was PAINFUL.

However, there is a happy ending. I have a daughter who is very happy with her latest trinket box.


Boo!

Is it too early for Halloween fabric? I don't think so. Especially when you are as talented at procrastinating as I am. So today I bought this fabulous little bundle from my favourite fabric store:


This collection is called "Boo to You" from Riley Blake Designs. I always, always love Riley Blake fabrics. They never disappoint. I will be making the kids some trick or treat bags with these this year. Get your own bundle at Venezie Designs.

A little something for me...

I came across this great little Etsy shop, Sheri's Designs, that sells custom jewelry. I hearted one of her family rings and Sheri messaged me a day later asking if I'd be interested in a trade. I agreed right away and Sheri made me the most beautiful ring. I am not very girly and wanted something simple and not too big. This ring is PERFECT. Sheri was wonderful to work with and I am very happy!


Sheri also has a great selection of pendants and earrings.

Folding your reusable shopping bag

Step 1:
Lay bag flat on surface.


Step 2:
Tuck in sides of bag to make it square shaped.


Step 3:
Fold straps down.


Step 4:
Fold in 1/3 of bag towards centre.


Step 5:
Fold in other 1/3 of bag towards centre.


Step 6:
Roll up bag from bottom towards the ties. Use the ties to wrap around the roll and secure with a bow.


That's it!

Pattern Review: Strap Clutch by Keyka Lou

Whenever Michelle from Keyka Lou releases a new pattern, I am ON IT. I love her patterns. They are super easy to sew, the materials are easy to find, the styles are always great, the items are useful and my customers really love them. I find it easy to alter them if necessary and I always find a way to give them my own personal touch.

The latest pattern is called the Strap Clutch and it is a very BIG clutch with a unique flap/strap closure. She has designed a flap that has a rectangle shaped opening created using the same technique as the handles on her Dewdrop Handbag, Bracelet Bag and Charm School Handbag. She then added a strap that comes from the bottom of the clutch with a velcro closure that loops into the flap's opening.

I love the ability to add some stitching to the bottom of the clutch and the technique she used to box the corners adds a lot of personality.

For my first attempt, I decided to try out my new Prince Charming fabrics by Tula Pink and a green cotton canvas for the body. Of course there are tons of different interfacings out there but my latest fave is Pellon 70 sew-in which I used to reinforce the body. It makes a really nice sturdy bag that is very light. For the flap and inside slip pocket, I used my Crafter's Choice fusible. I can usually read the pattern once and sew it by memory but this time, there are a few steps that were new to me so I printed out the instructions to follow.

I did make a few changes: I added fusible interfacing to the small pieces of fabric used to make the cut out in the flap pieces (I find it easier to work with that way and reinforces the opening a bit more) and I added a leather blossom to the strap instead of a button. I also omitted the buttons on the corners - mostly because I had nothing that matched! For the inside pockets, I just created 2 larger slip pockets instead of the 1 large pocket with 2 pen pockets. And last, I added a lobster clasp to attach keys so they don't get lost in the clutch.

My finished product:


I am certainly going to make more of these. I plan on trying some with a cross-body strap as well to make a mini-messenger. If you would like to buy the pattern, you can do so here. Make sure you read Michelle's blog as well. I noticed she added some posts with alterations to the original pattern. :)

Featured Etsy Seller: Megs Crochet Jewels

If you love jewelry and you're looking for something unique, take a peek at Megs Crochet Jewels. Meghan specializes in handmade crochet jewelry using wire, ribbon, leather, cotton and she offers ready to ship items as well as custom pieces.
I decided to go the custom route and my first order from Meg was this gorgeous cuff made with silver wire and blue glass beads. At first I was worried that the wire would be rough on my skin but it is so incredibly comfortable and light. I barely notice I have it on. The clasp has 3 different rings that make it adjustable - which is great because I have very small wrists.


I couldn't be happier and decided to order a second custom bracelet. This time I wanted a more casual bracelet that I could wear every day and I decided on a multicoloured beaded cuff made with a natural cotton string. It turned out perfect and Meg came up with a unique bead and loop closure that makes it very easy to put on with one hand.


I must confess that since I have become a WAHM, I rarely wear jewelry (or makeup or anything other than yoga pants) but I have been wearing my casual bracelet almost every day. I think my next purchase from Meg would have to be something like this....

You can see more of Meghan's work on Etsy and she also can be found on Facebook.