Sunday, September 11, 2011

Pretty (yet painful) fabric flowers

My daughter LOVES small pouches, containers and boxes to store her treasures. So, after researching fabric flowers yesterday I decided to try making some small flowers to decorate a small wooden box for her. I found this fabulous (and very easy) tutorial on how to make no-sew fabric flowers. The flower assembly went smoothly and as I was gluing them onto the lid of the box, I fumbled and the largest flower fell - hot glue side down - onto my finger. I quickly ran to the sink and pulled the glue off along with 2 or 3 layers of skin. It was PAINFUL.

However, there is a happy ending. I have a daughter who is very happy with her latest trinket box.


Boo!

Is it too early for Halloween fabric? I don't think so. Especially when you are as talented at procrastinating as I am. So today I bought this fabulous little bundle from my favourite fabric store:


This collection is called "Boo to You" from Riley Blake Designs. I always, always love Riley Blake fabrics. They never disappoint. I will be making the kids some trick or treat bags with these this year. Get your own bundle at Venezie Designs.

A little something for me...

I came across this great little Etsy shop, Sheri's Designs, that sells custom jewelry. I hearted one of her family rings and Sheri messaged me a day later asking if I'd be interested in a trade. I agreed right away and Sheri made me the most beautiful ring. I am not very girly and wanted something simple and not too big. This ring is PERFECT. Sheri was wonderful to work with and I am very happy!


Sheri also has a great selection of pendants and earrings.

Folding your reusable shopping bag

Step 1:
Lay bag flat on surface.


Step 2:
Tuck in sides of bag to make it square shaped.


Step 3:
Fold straps down.


Step 4:
Fold in 1/3 of bag towards centre.


Step 5:
Fold in other 1/3 of bag towards centre.


Step 6:
Roll up bag from bottom towards the ties. Use the ties to wrap around the roll and secure with a bow.


That's it!

Pattern Review: Strap Clutch by Keyka Lou

Whenever Michelle from Keyka Lou releases a new pattern, I am ON IT. I love her patterns. They are super easy to sew, the materials are easy to find, the styles are always great, the items are useful and my customers really love them. I find it easy to alter them if necessary and I always find a way to give them my own personal touch.

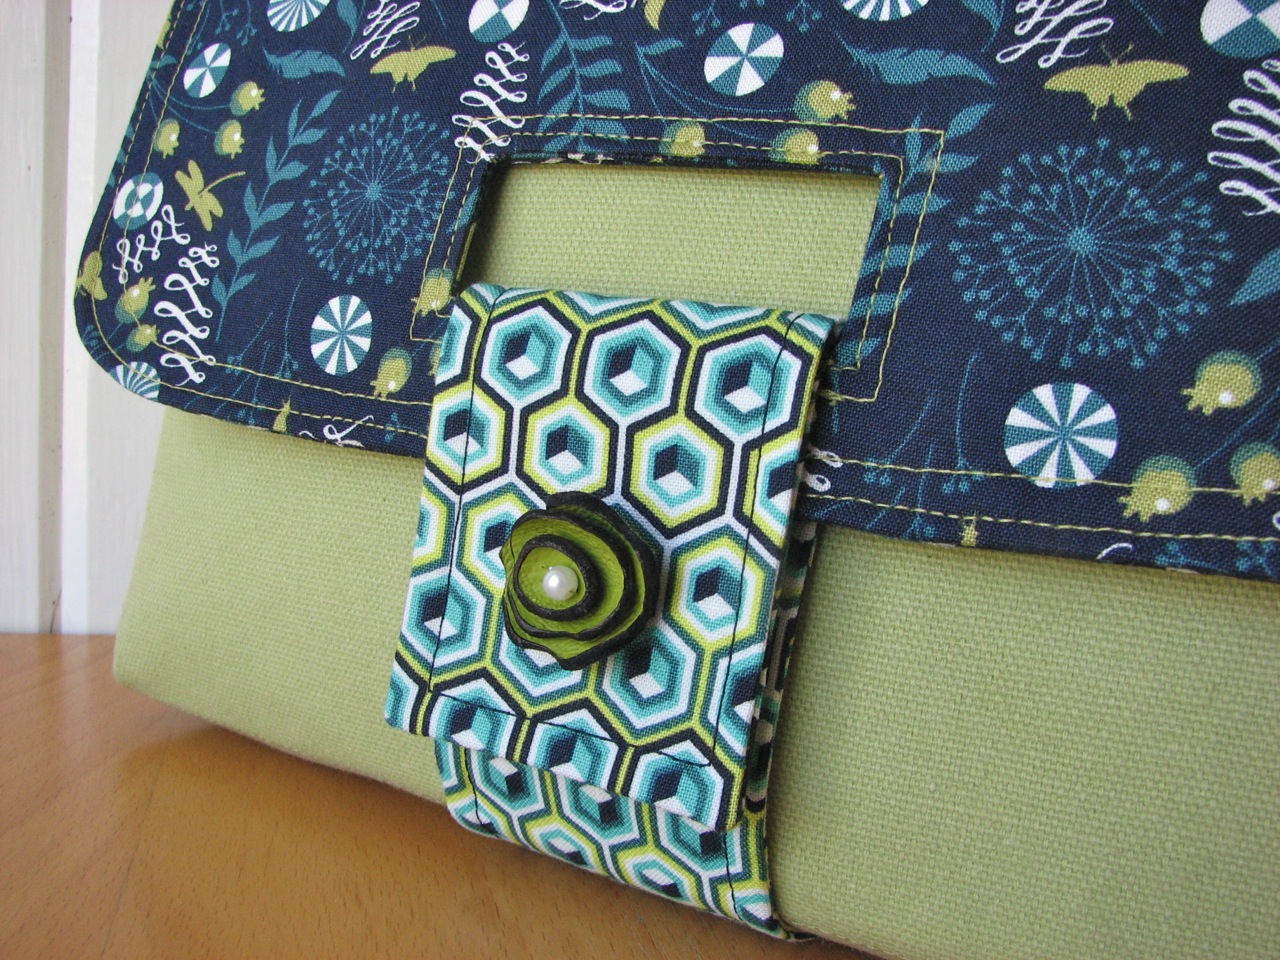
The latest pattern is called the Strap Clutch and it is a very BIG clutch with a unique flap/strap closure. She has designed a flap that has a rectangle shaped opening created using the same technique as the handles on her Dewdrop Handbag, Bracelet Bag and Charm School Handbag. She then added a strap that comes from the bottom of the clutch with a velcro closure that loops into the flap's opening.

I love the ability to add some stitching to the bottom of the clutch and the technique she used to box the corners adds a lot of personality.

For my first attempt, I decided to try out my new Prince Charming fabrics by Tula Pink and a green cotton canvas for the body. Of course there are tons of different interfacings out there but my latest fave is Pellon 70 sew-in which I used to reinforce the body. It makes a really nice sturdy bag that is very light. For the flap and inside slip pocket, I used my Crafter's Choice fusible. I can usually read the pattern once and sew it by memory but this time, there are a few steps that were new to me so I printed out the instructions to follow.

I did make a few changes: I added fusible interfacing to the small pieces of fabric used to make the cut out in the flap pieces (I find it easier to work with that way and reinforces the opening a bit more) and I added a leather blossom to the strap instead of a button. I also omitted the buttons on the corners - mostly because I had nothing that matched! For the inside pockets, I just created 2 larger slip pockets instead of the 1 large pocket with 2 pen pockets. And last, I added a lobster clasp to attach keys so they don't get lost in the clutch.

My finished product:


I am certainly going to make more of these. I plan on trying some with a cross-body strap as well to make a mini-messenger. If you would like to buy the pattern, you can do so here. Make sure you read Michelle's blog as well. I noticed she added some posts with alterations to the original pattern. :)

Featured Etsy Seller: Megs Crochet Jewels

If you love jewelry and you're looking for something unique, take a peek at Megs Crochet Jewels. Meghan specializes in handmade crochet jewelry using wire, ribbon, leather, cotton and she offers ready to ship items as well as custom pieces.
I decided to go the custom route and my first order from Meg was this gorgeous cuff made with silver wire and blue glass beads. At first I was worried that the wire would be rough on my skin but it is so incredibly comfortable and light. I barely notice I have it on. The clasp has 3 different rings that make it adjustable - which is great because I have very small wrists.


I couldn't be happier and decided to order a second custom bracelet. This time I wanted a more casual bracelet that I could wear every day and I decided on a multicoloured beaded cuff made with a natural cotton string. It turned out perfect and Meg came up with a unique bead and loop closure that makes it very easy to put on with one hand.


I must confess that since I have become a WAHM, I rarely wear jewelry (or makeup or anything other than yoga pants) but I have been wearing my casual bracelet almost every day. I think my next purchase from Meg would have to be something like this....

You can see more of Meghan's work on Etsy and she also can be found on Facebook.