Showing posts with label strap. Show all posts

Wednesday, May 27, 2015

Tutorial: Wristlet wrist strap

I have seen many different ways to sew a wrist strap thoughout the years and I had an "ah-ha" moment while working on the wrist strap for my latest pattern and decided to whip up a short tutorial to share with everyone.

The great part about this wrist strap is that it does not have any exposed raw edges at all - not hidden in the D-ring, not hidden inside the strap. In this example I will be making a strap that is 1 inch wide. (You can adjust accordingly for your project - just keep in mind that you need to quadruple the amount of fabric you want so if you want a strap that is 1/2" thick, you will need to cut your fabric 2 inches high.)

For this tutorial you will need:
  • (1) D-ring strap fabric 3 inches W x 4 inches H
  • (1) piece lightweight fusible interfacing 3 inches W x 4 inches H
  • (1) Wrist strap fabric 15 inches W x 4 inches H
  • (1) piece lightweight fusible interfacing 15 inches W x 4 inches H
  • (1) 1" D-ring
  • (1) 1" Swivel clasp
 Before starting, fuse the matching interfacing to the wrong side of both strap pieces.

Create your D-ring strap piece:

Start by folding the strap piece horizontally, press to create a crease. You should now have a piece that is now 3 inches W x 2 inches H.


 Open up the strap piece and fold both halves in towards the center crease. Press.


Fold in half again along original crease. Press. You should end up with a strap piece like the photo below.


Stitch along both sides of the strap piece with a 1/8" seam allowance.


Slip the strap piece through your D-ring. Fold the ends together and baste stitch together. Set aside.


Create your wrist strap:

Follow the same steps as the D-ring strap piece with the wrist strap piece until you end up with a fabric casing as shown in photo below. DO NOT stitch the strap closed yet!


Take your swivel clasp and pass the wrist strap piece through the ring of the swivel clasp. Now take both shorter edges of the strap piece and open them up. Make sure you do not twist the strap piece and pin the edges right sides together.


Stitch the shorter edges together. 


Press the seam allowance open.


Then re-fold your wrist strap into a loop that is 4 layers thick. 


Pass the strap around the arm of your machine and stitch one edge of the strap with a 1/8" seam allowance making sure you are pushing the swivel clasp out of the way as you sew. Make sure to backstitch at the end.
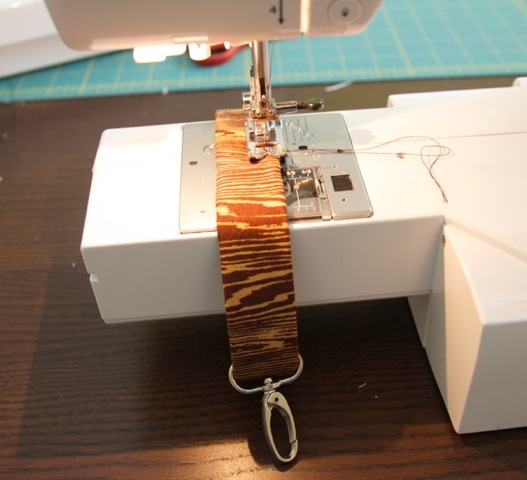

Stitch the other edge of the strap with a 1/8" seam allowance again sliding the swivel clasp down as you sew.


Now find the joining seam and place it close to the swivel clasp's ring but not inside (it will be too bulky because of the seam). Stitch right on that seam (I stitched a square pattern on my strap) to close the loop and stitch your swivel clasp in place.


You're done! Now you just need to attach your D-ring strap to your project.


Monday, March 2, 2015

Faux Leather Strap Tutorial

In one of my latest patterns - the Zinnia bag -  I provide instructions on how to sew faux leather straps. I thought that sharing my technique would be extremely helpful as I get so many questions about sewing with faux leather.

With the right tools, you do not need to be afraid of faux leather! My one recommendation is this: get a walking foot attachment for your sewing machine. You will not regret it. I realize they are expensive but I have used my walking foot in so many projects now, it has paid itself off time and time again. It is not just for quilting. It deals with sticky materials such as vinyl and faux leather much better than a teflon foot. It also sews PUL, ProCare and Ripstop nylon beautifully!

Without further delay, here are my instructions for the faux leather strap taken directly from my Zinnia sewing pattern. These instructions are for shoulder straps but you can apply the same technique if you are making a longer adjustable cross body strap.

Start by cutting out your faux leather. You will need:

  • (4) pieces faux leather 22 inches W x 2 inches H
  • (4) pieces faux leather 5 inches W x 2 inches H

You will also need (4) 1-inch O rings - 2 for each shoulder strap.

Take one of the shorter strap pieces and draw a line through the centre horizontally.


Now fold in one half of the strap piece in towards the centre line you just drew and sew it
in place. Keep folding and sewing as you go until you’ve sewn that whole side.


Do the same for the other side.


Now pass the piece of strap through one of the O-rings and sew both ends together.

Repeat steps 1-4 for the other 3 short strap pieces. Now take 2 of the longer faux leather strap pieces and draw a horizontal line through the centre of the strap.

Now take the 2 pieces and sew the short ends RST.


Open up the seam you just sewed and topstitch the seam allowance down on both sides.


Now pass that strap piece through 2 of the O-rings with the shorter strap pieces you
created in steps 1-4.


Sew together the other 2 short strap ends RST. Once again, sew down the seam
allowance on both sides of the 2nd seam.


Like you did for the short strap pieces, you need to sew down one half of the strap
towards the centre line you drew. You will need to move the O-rings as required as you
are sewing. Sew down the other half also.


Now you should have one long strap loop. Place your O-rings at opposite ends of the
loop (I place them at the seams on the strap) and then clip the 2 sections of strap together
to keep them in place.


Now you are going to sew the strap halves together to create one strap with 4 thicknesses
of faux leather and the open section sandwiched inside. You will sew one rectangular
shaped seam with a 1/8” seam allowance.


You should end up with a strap that looks like this with 4 lines of stitching:


Repeat the same steps to create a second strap and you are done! You just need to sew them onto your bag. To attach your straps to your bag, you need to measure equal distance from the outer
edge of each side of the top of your bag's exterior and baste stitch your strap in place. Make sure you
do not attach your straps twisted!!


I hope this tutorial was helpful! Please do leave any questions you may have in the comments below and I will do my best to respond quickly.