While browsing a fellow Canadian's sewing blog recently, I discovered the Caravan tote pattern by Noodlehead. I have thought about designing a tote bag pattern many times but was never really inspired by an idea. I immediately loved the look of this tote bag and decided to give it a try!
Like all patterns by Noodlehead, the instructions were clear and easy to follow. Although the pattern piece dimensions were provided, I am lazy and prefer to print out the pieces and cut my fabric that way.
However, I did make some modifications because I was missing some notions. I didn't have a 14 inch metal zipper and I thought that the metal zipper in her photos really improved the appearance of the bag. So I ended up using a 12 inch zipper and just increased the width of the zipper tabs. It worked out perfectly!
I also didn't have size 24 snaps so I ended up using some of my cowgirl snaps. They aren't as prominent on the flap but I like that I can match them with the fabrics I used.
I also decided on using real leather for the straps AND I added a leather rectangle to the bottom of the bag. I like to set my bag down and I don't like doing that with fabric bags - they get dirty so quickly! So I stitched up the bottom seam first, pressed the seam open and then stitched on a leather rectangle that matched my straps. I then continued sewing the sides and corners of the bag.
I ended up adding an additional slip pocket inside the bag. It seemed like such a shame that a large bag would only have one slip pocket so my tote has 2.
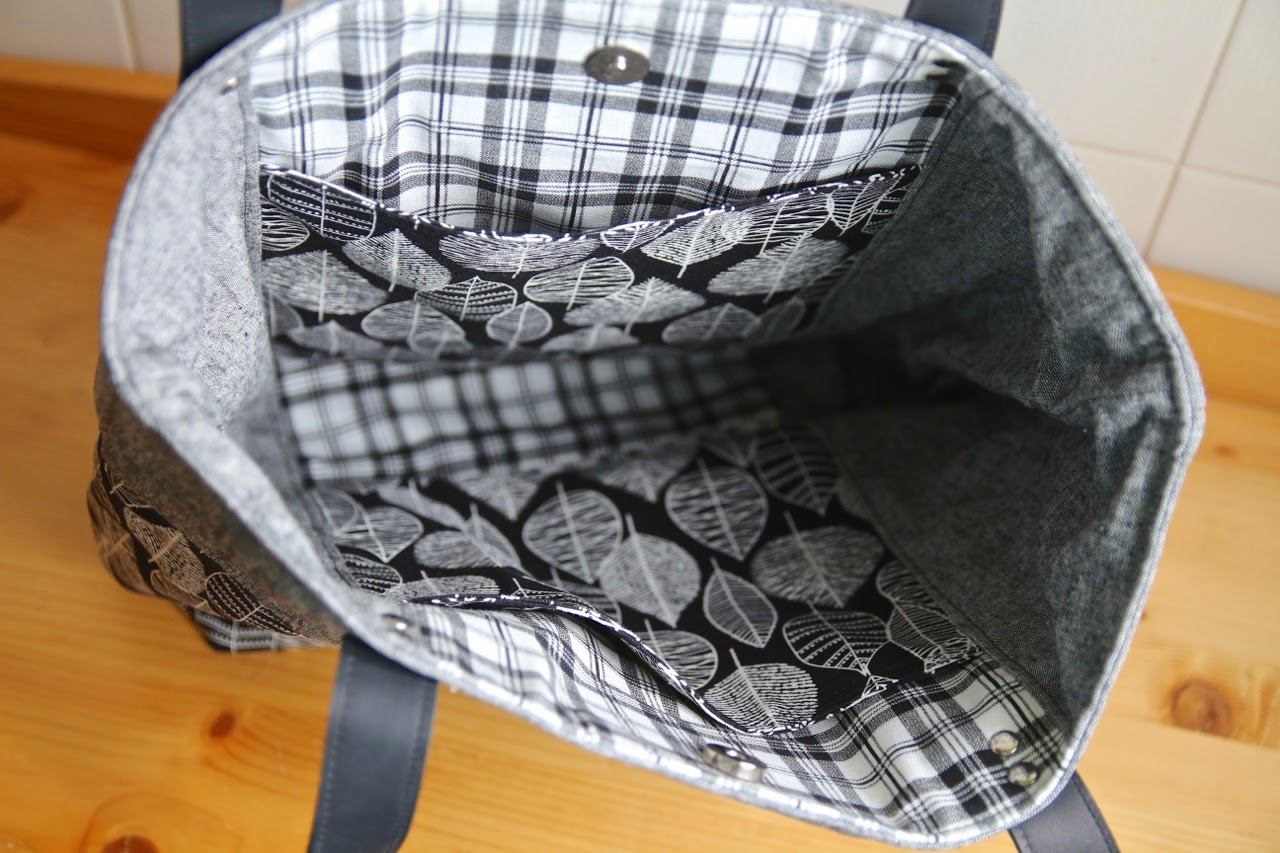
This bag sews up fairly quickly and it is quite easy to make. The only thing I didn't care for (and this is just my personal preference) was the 1/2 inch seam allowance. I really prefer a 3/8 inch seam allowance because it is so much easier to follow the edge of your presser foot rather than follow a guide line. Again, maybe just laziness on my part!
I plan on making more of these beautiful tote bags! I don't currently carry tote bags in my Etsy shop and my customers seem to really love this design.
Tuesday, March 10, 2015
Monday, March 2, 2015
Faux Leather Strap Tutorial
In one of my latest patterns - the Zinnia bag - I provide instructions on how to sew faux leather straps. I thought that sharing my technique would be extremely helpful as I get so many questions about sewing with faux leather.
With the right tools, you do not need to be afraid of faux leather! My one recommendation is this: get a walking foot attachment for your sewing machine. You will not regret it. I realize they are expensive but I have used my walking foot in so many projects now, it has paid itself off time and time again. It is not just for quilting. It deals with sticky materials such as vinyl and faux leather much better than a teflon foot. It also sews PUL, ProCare and Ripstop nylon beautifully!
Without further delay, here are my instructions for the faux leather strap taken directly from my Zinnia sewing pattern. These instructions are for shoulder straps but you can apply the same technique if you are making a longer adjustable cross body strap.
Start by cutting out your faux leather. You will need:
- (4) pieces faux leather 22 inches W x 2 inches H
- (4) pieces faux leather 5 inches W x 2 inches H
You will also need (4) 1-inch O rings - 2 for each shoulder strap.
Take one of the shorter strap pieces and draw a line through the centre horizontally.
Now fold in one half of the strap piece in towards the centre line you just drew and sew it
in place. Keep folding and sewing as you go until you’ve sewn that whole side.
Do the same for the other side.
Now pass the piece of strap through one of the O-rings and sew both ends together.
Repeat steps 1-4 for the other 3 short strap pieces. Now take 2 of the longer faux leather strap pieces and draw a horizontal line through the centre of the strap.
Now take the 2 pieces and sew the short ends RST.
Open up the seam you just sewed and topstitch the seam allowance down on both sides.
Now pass that strap piece through 2 of the O-rings with the shorter strap pieces you
created in steps 1-4.
Sew together the other 2 short strap ends RST. Once again, sew down the seam
allowance on both sides of the 2nd seam.
Like you did for the short strap pieces, you need to sew down one half of the strap
towards the centre line you drew. You will need to move the O-rings as required as you
are sewing. Sew down the other half also.
Now you should have one long strap loop. Place your O-rings at opposite ends of the
loop (I place them at the seams on the strap) and then clip the 2 sections of strap together
to keep them in place.
Now you are going to sew the strap halves together to create one strap with 4 thicknesses
of faux leather and the open section sandwiched inside. You will sew one rectangular
shaped seam with a 1/8” seam allowance.
You should end up with a strap that looks like this with 4 lines of stitching:
Repeat the same steps to create a second strap and you are done! You just need to sew them onto your bag. To attach your straps to your bag, you need to measure equal distance from the outer
edge of each side of the top of your bag's exterior and baste stitch your strap in place. Make sure you
do not attach your straps twisted!!
I hope this tutorial was helpful! Please do leave any questions you may have in the comments below and I will do my best to respond quickly.
Friday, February 6, 2015
Coming soon: iPad Messenger Bag Pattern!
I am a bit behind schedule this month in terms of new patterns and I believe this one will be my only pattern for February. We are doing a small renovation in the house and there are some birthdays to celebrate which means less sewing time.
I have been sketching messenger bag ideas for a very long time now. I get started on some ideas and then I see a very cool bag online and I get discouraged. It's all part of the creative process right?
But I finally settled on something and came up with this:
I don't have a "flowery" themed name yet but I have a lot of pictures and details! For the outside, I pieced together some dark grey faux leather and a beautiful Tula Pink print for the front of the flap. I added some piping to the flap - which I NEVER do - and I really like that special classy feel it gives the bag. I used my usual swivel clasp closure which I really prefer instead of a magnetic snap because I find the snaps less forgiving if your bag is empty/full.
This bag has a gusset. Meaning I didn't miter the corners on this one. It has a few more pieces to assemble but I think it will be easier to sew for those who don't have very powerful sewing machines because it means less bulky seams like you sometimes find at side seams. It also means the strap rings can be sewn like this:
And I know for some the bulk of straps at the ends on top of side seams is VERY tough for some machines.
As you can see, I used a heavy cotton webbing for the strap. I used to hesitate using webbing because it frays but once you figure out casings for strap ends (which I think are a great touch!), you end up with some durable and pretty straps. Not to mention a lot less time consuming than making your own straps!
Under the flap, I have 2 pen slip pockets and 2 smaller slip pockets. The slip pockets are the perfect size for smart phones, small notebooks.
Inside the bag I have the following:
Width: 12.5 inches
Height: 9.25 inches
Depth: just under 3 inches
I think this bag will be suitable for beginners with some sewing experience since nothing is very difficult. It will just be a longer project because of all the pockets to sew.
Look for this new pattern to arrive before the end of February!
I have been sketching messenger bag ideas for a very long time now. I get started on some ideas and then I see a very cool bag online and I get discouraged. It's all part of the creative process right?
But I finally settled on something and came up with this:
I don't have a "flowery" themed name yet but I have a lot of pictures and details! For the outside, I pieced together some dark grey faux leather and a beautiful Tula Pink print for the front of the flap. I added some piping to the flap - which I NEVER do - and I really like that special classy feel it gives the bag. I used my usual swivel clasp closure which I really prefer instead of a magnetic snap because I find the snaps less forgiving if your bag is empty/full.
This bag has a gusset. Meaning I didn't miter the corners on this one. It has a few more pieces to assemble but I think it will be easier to sew for those who don't have very powerful sewing machines because it means less bulky seams like you sometimes find at side seams. It also means the strap rings can be sewn like this:
And I know for some the bulk of straps at the ends on top of side seams is VERY tough for some machines.
As you can see, I used a heavy cotton webbing for the strap. I used to hesitate using webbing because it frays but once you figure out casings for strap ends (which I think are a great touch!), you end up with some durable and pretty straps. Not to mention a lot less time consuming than making your own straps!
Under the flap, I have 2 pen slip pockets and 2 smaller slip pockets. The slip pockets are the perfect size for smart phones, small notebooks.
Inside the bag I have the following:
- A large padded, structure compartment for your iPad
- 1 zippered pocket for valuables
- 2 large slip pockets
- And of course a large main compartment for notebooks, water bottles, etc. It will fit regular sheets of paper.
Width: 12.5 inches
Height: 9.25 inches
Depth: just under 3 inches
I think this bag will be suitable for beginners with some sewing experience since nothing is very difficult. It will just be a longer project because of all the pockets to sew.
Look for this new pattern to arrive before the end of February!
Friday, January 30, 2015
The Begonia Convertible Bag - Now Available!
I managed to meet my goal of 2 new patterns this month! I have completed the Begonia pattern and it is now available in my pattern shop.
There are a few flap design options I have not included in the pattern which I will prepare and make available here on my blog as free tutorials. This will include the herringbone patchwork version and the square patchwork you see in the photo above, top left. Stay tuned!
Saturday, January 17, 2015
Pattern Review: India Hobo Bag
Even though I am a pattern designer now, I still LOVE to try out other patterns. Sometimes I get inspired for a pattern of my own or I learn about a new technique. I make sure to never copy someone else's work. I know the time and effort that goes into coming up with a new design, drafting pattern pieces, sewing sample bags, photographing, writing the PDF. It is time consuming!
I recently tried out the India Hobo Bag. I was looking for a larger bag for myself because I do tend to carry small to medium sized bags and they tend to get a little stuffed. I was so pleased by how easily this bag sews that I made a few for my Etsy shop. The pieces just seem to line up perfectly when sewing!
This pattern allows you to make hobo bags in 2 different sizes. I only made the large size but I could see the smaller size being very roomy as well. There are 2 very large open pockets on the outside and I made another one of those large pockets on the inside plus a zippered pocket. You could make it with 4 open pockets AND a zippered pocket but I chose to leave more space on the inside.
There are so many possibilities for this bag in terms of fabric and pattern placement. I used a patterned linen on the underside of one strap and I thought it was a very nice touch. The strap itself is really nice and wide so if you're carrying heavy items, it will definitely be more comfortable. The strap length is not adjustable and I did find it was a bit low on my body (I am 5'6") so it may be not ideal for shorter folks but that really is personal preference.
This is not a stiff bag. It is definitely meant to be slouchy! I think it could be made stiffer but would not look quite right. I just interfaced with duck canvas which resulted in the perfect amount of stiffness and structure. I tried a variety of exterior fabrics: faux leather, denim, linen. They all worked out without any issues!
What would I change about this bag? I think I need some kind of closure for the top. Probably just a magnetic snap or a button/loop closure would do the trick but when it sort of just hangs open, I get worried that things will fall out. Other than that, I love this bag!
I recently tried out the India Hobo Bag. I was looking for a larger bag for myself because I do tend to carry small to medium sized bags and they tend to get a little stuffed. I was so pleased by how easily this bag sews that I made a few for my Etsy shop. The pieces just seem to line up perfectly when sewing!
![]() |
| Faux leather bottom, bleached twill, canvas |
![]() |
| Denim and linen bag |
This pattern allows you to make hobo bags in 2 different sizes. I only made the large size but I could see the smaller size being very roomy as well. There are 2 very large open pockets on the outside and I made another one of those large pockets on the inside plus a zippered pocket. You could make it with 4 open pockets AND a zippered pocket but I chose to leave more space on the inside.
![]() |
| One large open pocket and one zippered pocket |
There are so many possibilities for this bag in terms of fabric and pattern placement. I used a patterned linen on the underside of one strap and I thought it was a very nice touch. The strap itself is really nice and wide so if you're carrying heavy items, it will definitely be more comfortable. The strap length is not adjustable and I did find it was a bit low on my body (I am 5'6") so it may be not ideal for shorter folks but that really is personal preference.
![]() |
| Beautiful feather print on the underside of the strap! |
This is not a stiff bag. It is definitely meant to be slouchy! I think it could be made stiffer but would not look quite right. I just interfaced with duck canvas which resulted in the perfect amount of stiffness and structure. I tried a variety of exterior fabrics: faux leather, denim, linen. They all worked out without any issues!
![]() |
| Faux leather option! |
What would I change about this bag? I think I need some kind of closure for the top. Probably just a magnetic snap or a button/loop closure would do the trick but when it sort of just hangs open, I get worried that things will fall out. Other than that, I love this bag!
Fabric Friday: Plaid Home Decor
I realize this is a Saturday but I forgot to post what will now become Fabric Friday!
Found this beautiful plaid at my local fabric store last weekend. It is a heavyweight home decor print. Nice and sturdy for a tote. Just need to decide whether to accent with black or brown faux leather. What do you think?
Tuesday, January 13, 2015
Coming soon: The Begonia Convertible Belt Bag
Today I am introducing my latest sewing pattern: the Begonia Convertible belt bag!
This is a fabulous bag because it can be worn 3 different ways: over one shoulder, across the body AND as a belt bag. A couple of years ago, I did have something similar in my shop and for some strange reason (I always do this!), I stopped making it. But here is a new version and hopefully it will appeal to all the sewers out there!
The dimensions of this bag are 9 inches wide and about 6.5 inches high. I used faux leather to accent this bag but again, this is completely optional and for the pattern instructions, I will stick to using fabric only.
The bag has a flap and magnetic snap closure and there is a main focus fabric and an accent fabric along the bottom. I am hoping to make some variations of this and include them in the pattern. I think it's always good to give folks a lot of ideas for inspiration.
Under the flap on the outside, there are 2 slip pockets. One is a great size for a smart phone (iPhone 6 is pictured below) and the other could fit keys, lip balm, etc.
On the inside, there is the main compartment and one zippered pocket to store valuables.
I will also try to come up with a formula to figure out the appropriate size for the strap so that it fits around a person's waist. It is hard to come up with a length that will work for everyone so I think a formula would be most helpful.
I can really see this as a great travel bag because you can be hands free and still carry your essentials. I believe this bag could also accommodate most full size wallets!
I will sew up a few more samples along with the pattern sample bag and keep everyone updated on its progress. I am hoping to get Mr Blue Calla's help taking photos of the bag worn the 3 different ways as well.
Subscribe to:
Posts (Atom)


